
How To Make a Partial Epoxy Mold
I previously wrote a blog on making a leak-proof epoxy table mold with items from your local box store, but sometimes you don't always need a whole "aquarium" type mold. Sometimes you only need a corner or large crack filled. Anyone that has worked with these deep pour epoxies knows just how sneaky they can be when it comes to finding a way to spring a leak. Deep pour epoxies are traditionally very thin, so they can and will find their way through the smallest pinhole gaps. Not to mention that they don't begin to set up for around 12 hours. So even a pinhole leak can drain an entire table overnight. The solution? You can use the same techniques used in my traditional epoxy table molds and apply them to only a specific slab section.
I will be skipping some of the basic steps when it comes to making an epoxy table so I can focus on the mold-making process specifically. If you have questions on the entire process, check out my How To Make an Epoxy Table blog here.
Slab Starting Point
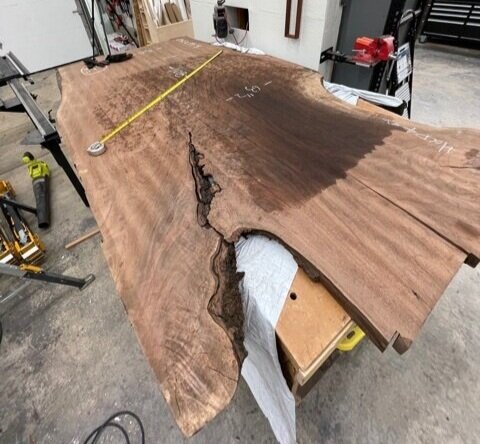
The slab I am starting this epoxy island with.
We will be using straight melamine pieces to make our partial mold, so the more straight edges you can have on your slab, the better. For my latest project, I was filling a large void on the corner of a slab. So I cut the two sides surrounding the void with my track saw. Doing my best to cut them more or less perpendicular.
Cutting Melamine To Size
Traditional epoxy molds are not made to precision. These partial epoxy molds are even less precise. You just want enough to cover your void underneath, plus a few inches on either side. If you have a crack that is six inches wide and 30" long, cut a piece that is 12x35". Or 24x50 if you really want. Just don't cut it 7x31". Do the same for the sides of your mold. If your slab is 2" thick, and your crack is 6" wide, cut a piece that is 4" tall and 12" wide. Or 3" and 16", you get the idea. Since my void landed on a corner, I needed to cut two side pieces that connected in the corner.
Mold Release
Before you attempt to attach this form to your table, don't forget the mold release. I get asked all of the time if mold release is necessary. The answer is yes. You don't have to buy the brand that I use, but you need some release agent. I hear people tell me they use paste wax, WD40, cooking oil, all kinds of weird stuff. I use real mold release because I am too much of a chicken to risk a $1000 epoxy project to save maybe 15 cents of mold release spray. That said, use whatever works for you (and tag me with your weirdest successes).
Caulk Your Slab

Painter’s tape probably doesn’t do much.
I ran a line of painter's tape around the perimeter of my void, then ran a bead of caulk over the tape. The idea was, the tape would release the caulk after the epoxy was cured and prevent me from having to send the caulk through the planer. Spoiler, I almost always have to plane off the epoxy, caulk, and painter's tape regardless. So you are probably fine skipping the painter's tape step. It seems good in theory, though.
Clamp The Form To The Slab
Now you want to clamp your sheet of melamine directly to your slab. If you have a small void right on the edge, this will be pretty easy. However, if you have a large void in the middle of a 60" wide piece, it can be a bit trickier. For the parts where a clamp can't reach, I like to use a long 2x4 to apply pressure on the middle while clamping on the edges. Just do your best here. We will add a couple more layers of insurance before our pour.
Add Your Sides, Caulk It All
Now you can go ahead and add your side piece(s). Caulk underneath, in front, up the sides, and on the back. Basically, anywhere epoxy could potentially leak out. Add 18 gauge brad nails attaching your sides to your base as well. Now go and caulk the entire perimeter of the base. This might seem like overkill, but I learned this technique through some hard lessons/leaks.
Important: Let caulk cure overnight at a minimum. Again, hard lessons I have learned by pouring too early.
Optional Insurance
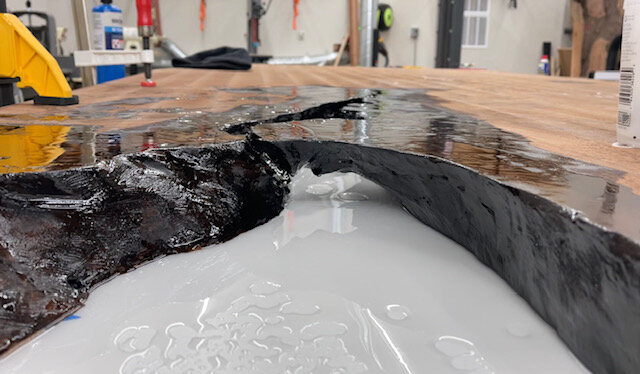
Aquarium tight seal with clear epoxy on this Walnut slab.
The most recent project where I built one of these partial molds was on a slab that wasn't perfectly flat. Even after I clamped and caulked everything, I wasn't confident I had a perfect aquarium tight seal. So I decided to go one step further and pre-seal the form with tabletop epoxy.
Tabletop epoxy is much thicker than deep pour epoxy; it also cures much faster. So, where a deep pour might leak, the tabletop might start to leak, but cure before more than a drop or two comes out. For that reason, I poured just enough clear tabletop epoxy so that it could have a chance to fill up any cracks and crevices that the caulk might not be able to handle. There is no set amount to how much you need to use. Just fill the bottom of your piece 1/16" full of clear tabletop epoxy, and you should be good to go. The center of the form doesn't need epoxy, just the edges. Don't worry about a color difference here; it will get planed off in the end. And even if a tiny area remained, you wouldn't be able to notice since it is clear. Let the tabletop epoxy cure/harden overnight.
Pour Your Epoxy!
Now you are ready to mix and pour your epoxy. A couple of final tips, though. First, have access to your potential leak points. Don't set this on the middle of a table where if you notice a pool of epoxy, you won't be able to do anything about it. If you do find a leak, don't panic. Keep some Wet-Patch on hand, and hopefully, that will be enough to stop any small drips. I've even heard of people using Flex-Tape or Flex Seal with success. Unfortunately, caulk doesn't contain an active leak though, I've tried. Don't pour and go to bed hoping for the best. Unless you subconsciously want an epoxy floor more than an epoxy table.