
The Modern Workbench/Miter Station
My wife says I insist on doing things the most challenging way possible. While she isn't wrong, I don't do things the hard way because I have some sort of work ethic. I do things the hard way because I want something a certain way, and most of the time, that can't be purchased at a local box store. Similar to how some guys prefer bespoke suits, I prefer bespoke workbenches.
Some of you may have been following along as I have transitioned my new shop into my dream woodshop. It has come a long way in just a couple of months. What started as a dimly lit RV garage has evolved into a pretty functional and brightly lit one-person woodshop. Feel free to check out the progress in one of my videos or blogs.
In this blog, I will go over what is potentially the most useful addition I have done yet. At least as far as my readers are concerned. My past improvements include a giant 5hp cyclone dust collection system, a sliding table saw that is 10' across, and a small addition to the building itself. Not exactly items everyone can add to their two or three-car garage. I am very proud of this modern spin on the traditional miter station workbench/workspace. Every inch of this design maximizes space, and much of it serves multiple purposes. Something everyone can benefit from. Especially the two-car garage guys.
Workbench Frame Material
I used similar aluminum extrusion for the outfeed table on my table saw.
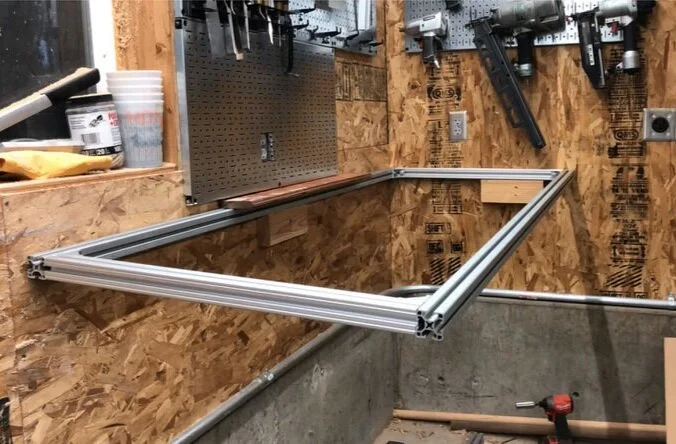
For the bench frame, I wanted a material that was, most importantly, dead flat. Which immediately ruled out solid wood. Solid wood is too prone to seasonal fluctuations and will always move slightly. Plywood was an option, but I feared it would lack the strength I wanted. At least in the particular design I had in mind. I wanted an open front to enable me to slide in my rolling toolboxes. So traditional plywood cabinets weren't going to work. Steel was a very viable option with a couple of drawbacks. First, I can't weld. So getting something custom made would be pretty expensive. Second, I wanted the bench to be able to be modified in the future. In the very likely situation I change miter saws or tool boxes; I didn't want to have to start completely over. My options were getting narrower and narrower at this point. I briefly considered unistrut. It's basically flat, extremely strong, inexpensive, and can be bolted together. I might have gone with unistrut if I hadn't finally thought of the obvious—aluminum extrusion.

You can see here how the T-nuts fit perfectly into the extrusion slots.
Aluminum extrusion, also known as 8020, is what CNC frames are made from. It is incredibly flat, extraordinarily strong, can be cut with wood tools, and has seemingly endless bolt-on accessories/brackets for complete adjustability. More expensive than unistrut, but better than nearly any other material in almost every way. Again, for the purposes of my design. I'm not saying you chose the wrong material for your bench... Even if you did.
I found the most intimidating thing about extrusion is understanding which series is which. I opted for 15 series extrusion, which is 1.5" in diameter. However, there is also 20 series extrusion, which is measured in millimeters. So 20 series is actually smaller than 15 series. So is 30 series (also mm). However, 15 series is compatible with most 40 series hardware (40mm=1.57"). Weird right? Anyway, the point is to ensure you are consistent in which extrusion you get and ensure the hardware you get is also compatible with your particular series.
8020 Extrusion Assembly
Assembling the benches was pretty straight forward. I mentioned earlier that I wanted to slide in my rolling tool boxes underneath. Which is a feature I brought from my old garage workshop and always liked. I have a 46" and a 62" rolling tool chest. So I needed to make the opening at least 6" larger to allow me to parallel park the benches underneath. I opted to make the openings even larger than that though to allow for larger toolboxes to be added later on.
I made all my cuts with my Evolution metal cutting saw. However, you can cut aluminum with your wood cutting miter saw if you are careful. I simply made one two-dimensional box from extrusion measuring 62x28", another one 72x28", and a third one 33x28". All attachments were done with simple 90-degree brackets and t-nuts. The first box will fit my 46" toolbox, the second my 62" toolbox, and the third will 'float' between the other two and hold my miter saw level with the other two benches. It is crucial to test the range of motion of your miter saw to ensure you don't bump into either side when you swing it all the way to left and right. My 12” Bosch miter saw needed 33” to allow for full travel.
Just screws holding this section to two walls at this point. More space, less materials this way.
To save money and materials, I drilled a hole in the extrusion and attached each section to the wall with construction screws into studs. Then I awkwardly supported the front of the bench while measuring the distance to the ground. This measurement doesn't need to be exact at this point. We'll level it later. Too short is better than too long though. Shimming up is easier than shortening the leg later.
So now I have two extrusion rectangles secured to the wall and supported by three legs. Two legs on one section, one leg on the longer section. The longer section is attached to two walls, in liu of a second leg. Again, maximizing the size of my bench in addition to saving on materials.
Framing brackets were a cheap way to secure the legs to the floor.
The center section will be secured between the two larger sections with the same 90-degree brackets on the front and then attached to the wall with construction screws on the back. To ensure I got the height below my two longer sections just right, I used my combination square to get the height of my miter saw table. Then just transferred that to each side of the supports.
Now that I had a decent skeleton of a workbench, I needed to secure the legs. For this, I rifled through the framing brackets at Home Depot until I found a 90-degree bracket that was 1.5" wide. I attached these brackets to each leg with carriage bolts, then drilled holes directly in my concrete floor. I then secured each leg to the ground with two Tapcon concrete anchors (the easiest ones I've found). Two of the legs needed to be leveled, so before bolting those brackets to the legs, I shimmed them up with playing cards. Then bolted them all together (and removed the cards).
Workbench Top material

1/2” MDF top going onto the 8020 skeleton frame.
Just like the frame material, I considered a lot of materials for the work surface. Solid wood was out for the same reasons mentioned before; Plywood is notorious for warping, thick melamine or particleboard might not be strong enough… Then there is MDF. Medium-density fiberboard or MDF, can get a bad rap sometimes. I once read that it possesses the water-resistant properties of a graham cracker. Which is not only hilarious but spot on. People also like to lump it in with particle board as far as durability goes. This is really not a fair comparison, though. MDF is shockingly strong. Just test it yourself some time with a dead-blow mallet. You might be amazed at how well it holds up. Not only is it strong, but it is also the flattest material I have come across. So there is no worrying about it bowing up on you down the road. Just like the CNC tables use extrusion, they also use MDF tops. For these same reasons.

Using body weight to attach the melamine top to the MDF with double sided tape.
sacrificial workbench top
To address the graham cracker paradox, my solution was simple, which was to add a sacrificial/replaceable top to the MDF. I read about people adding hardboard tops to their workbenches to enable them to simply replace the damaged ¼" top every year or two, instead of replacing the entire top itself. I loved this idea but wanted to find something more elegant than hardboard (just for aesthetics). I was able to find ¼ MDF black melamine from a specialty plywood dealer close to my house. This will be impact resistant and virtually waterproof.
To secure the ½ MDF top to the extrusion, I drilled some countersunk holes and used self-tapping sheet metal screws. Not the most elegant solution, but it works. To then secure the ¼" melamine to the MDF, I used permanent double-sided tape. This sounds weird, but that is what those hardboard guys were using, and they said it worked great. I'll keep you posted on how well it works over time, though.
All that was left was to secure my miter saw to the bench with a few bolts. I did shim it up just a few thousandths over the height the benches left and right, though. I hooked a shop vac up to a cyclone separator and attached that to my new Bosch miter saw. There will still be dust, but I am not a fan of those miter saw coffins that people build in an attempt to contain every spec of dust. Eventually, I will work on some modifications to increase the effectiveness of the dust collection, but for now, this will have to do. I at least have it hooked to an iVac switch that starts my vac automatically when I pull the trigger and continues to run for a few additional seconds before shutting off automatically.
If you are interested in using this exact design, the measurements are as follows: Left section, 62x28x41”. Center section, 33x28x37”. Right section, 72x28x41”. Top was 1/2” MDF with a 1/4” melamine top.
There will be lots more to come on my shop improvements. Check out the video on this build for even more details on how to create a super functional workspace using just one wall.

Finished miter station which features a ton of panels by Wall Control, benches by Husky Tools, and a Bosch miter saw.