
Power Carving Wood For Beginners
One of the suggestions I get most often is people asking if I can show them a project that can be done with limited tools, and/or a limited budget. These are usually comments on a video where I spent $1000 on a wood slab, $1000 on epoxy, and another $1000 on a custom steel base for a client. Most DIYers are looking for a project with a max budget of $300 or so. At least that is where I’d like to be if I’m making something just for fun. Power carving is even better than that. You can get started carving a green piece of firewood, or a stack lamination of scraps from your burn bin.
TOOLS REQUIRED
WOOD
Scraps for stack-lamination
Big chunk of firewood
Any old piece of wood
Other helpful tools and materials
WHAT DO YOU WANT TO CARVE?
This part is totally up to you. I have done a handful of power carved projects and there doesn’t appear to be a limit to how creative you can be. I have two Youtube videos out on power carving. In one video I carve an end table base from old scraps of walnut I pulled from my supplier's burn bin. In the second video, I carve an entire end table from a solid chunk of English Walnut. Although in that video I get some help from a chainsaw.
There are lots of people making amazing wood texture patterns with these grinding discs and burrs too. These can be done to add interest to a table base or custom lamp. Or they could be made as stand-alone wall art pieces. I am currently working on a project where I textured a log, then burn it for a pretty dramatic effect. So yeah, carve whatever you can dream up.
TOOLS

I mentioned in the introduction that you don’t need that many tools to get started carving. Just an angle grinder and a Kutzall disc at a bare minimum. I recommend a variable speed angle grinder if you are purchasing a new one. Although the fixed speed grinders work fine. Just a bit harder to control sometimes.

Kutzall makes several discs including fine, medium, and extreme grits. Each one is made by bonding tungsten carbide bits to a steel disc. They are extremely sharp, don’t lose their temper when hot (you can even clean them with a torch). And because they’re carbide, they stay sharp a very long time. I don’t think it is necessary to purchase every single grit they make. I would start with just the extreme and fine discs. You’ll see how fast the fine disc removes material. In fact, most people will be ok with just the fine disc.

If you want to get a little fancier you can add some of the Kutzall rotary burrs to your power carving lineup. The burrs are awesome for adding texture, fine detail, or just opening up a hole in your drywall. You’ll need a die grinder with a 1/4” collet for the burrs though. Or a Dremel for the ⅛’ shaft burrs.
Other than the angle grinder and Kutzall discs, the rest is up to you. More tools generally make life easier. An orbital sander, chainsaw, rasps, and clamps are just a few items you will likely end up using if you have access to them.
PPE

I know, most of you will probably skip past this section. But angle grinders spinning carbide bits at 20k RPM are no joke. A face shield is highly recommended at a minimum. The wood bits can come off in a hurry, so get those peepers protected. These discs also create a pretty fine dust. So I also recommend a good respirator. Gloves are a bit of a contested piece of PPE. Traditionally, gloves and woodworking are taboo. The idea is that gloves can get caught in a rotating machine and pull you into it. Things can get graphic from there. That said, I don’t see these discs as a high risk for that. There is a pretty significant risk of having the disc burn a hole in your hand rather quickly though. So I wear gloves. I have grazed the disc with my hand and it burned partially through the glove before. It didn’t suck my hand in, and I saved some skin that time. All that said, there are no guarantees expressed or implied by Blacktail Studio LLC (I hope that satisfies the attorneys).
WOOD CHOICE
One of my favorite things about power carving is the variety of wood you can use. Unlike a table that requires clear, dry dimensional lumber or dry slabs. Power carving can be done with green wood. Similar to how woodturners work. Carving your green piece 90% of the way, let it dry, then finish carving/sanding/finishing. One way around waiting that long is also used by woodturners. You can glue up a stack of dry blocks and carve your piece from that. The advantage to this is your piece is immediately ready for finish, you can use wood otherwise destined for the fireplace, and you generally end up with a crack-free rock solid piece.
CARVING PROCESS
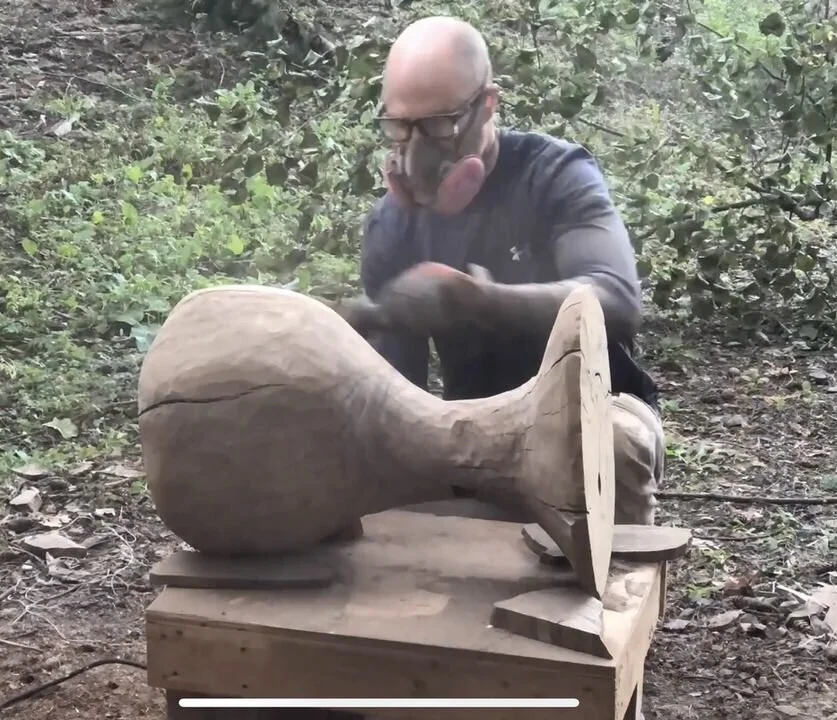
Power carving the rough shape of the end table
The actual process of power carving is primarily learned through experience. Grip the grinder securely and ease the edge of the disc into your piece. Keep the disc spinning away from you as it contacts the wood. Blade guards are cumbersome but beneficial to your health. Just start slow and pretty soon you’ll realize the disc isn’t as intimidating as you first thought. I highly recommend practicing on some scrap before you dive into that heirloom table you want to carve.
I am drawn to very organic shapes. Long sweeping curves. Trying to keep the ‘bumps’ to a minimum. Don’t be too critical about those bumps though. They will get smoothed out in the next step.
Once you like the overall shape of your piece you can put the power tools aside and bring out the hand tools. I am especially fond of rasps. Kutzall even makes a hand rasp with the same carbide technology as their carving discs. They are much more affordable than traditional hand-cut rasps and have benefits that I think put them ahead of most premium rasps. Check out my blog here for a deeper dive into these rasps.
SANDING AND FINISHING
Sanding these carved pieces can be a little different than traditional pieces. Especially if you leave a rough finish coming off the Kutzall as I do. My preferred method is to move to my orbital sander with a super soft pad and 40 grit sandpaper. This is kind of a bridge from carving to sanding. You can still do some light shaping with the 40 grit, and you definitely don’t want to move on to higher grits until you get all the Kutzall marks out.
Once you get your piece nice and smooth (At least as smooth as 40 grit can be anyway), you can work through your regular sanding progressions. I have a couple of blogs and videos on sanding and finishing. So feel free to check those out here, here, and here.
WHAT’S NEXT?
There are so many options for power carving. Table bases, tabletops, wall panels, end tables, free form art pieces, sculpted seats, or just traditional carving and shaping. Chainsaw carvers have been using the smaller burrs for years. You will frequently see them used for details like adding feathers to a bird sculpture, or shaping and detailing the eyes. If you’re like me and lack the skill for anything close to that, venture into texturing boards for various uses. Picture frames, details on bowls (or bowls themselves), or anything else you can think of