
Bending Epoxy with the Sun - Curved Epoxy Table
Epoxy tables are everywhere these days. The versatility of epoxy, coupled with the ability to use previously unusable woods, has taken the woodworking and interior design world by storm. But are epoxy tables just a passing fad? Something will we see in a decade and think, “that is SO 2020.” Or will makers continue to innovate and expand on what epoxy can do? Will manufacturers continue to improve the product and workability, further expanding what can go from imagination to reality? Only time will give us the answer to those questions, but as a maker, all I can do is attempt to improve and expand on what is already out there. This project started as an absolute hail-mary attempt at something I had never seen done before and ended up as one of the coolest projects I have ever made.
THe project
About a year ago I had an idea. I wanted to make a solid epoxy table top with a gradient blue color. It would start as dark blue and end with a very light blue tint at the other end. This idea seemed straightforward enough. Just mix some different epoxy colors, pour them into one mold, and let science do the rest. However, a year after pouring the epoxy, I decided to make things much more difficult for myself.

Pouring a blue gradient
I have a few premade epoxy forms I got from Concept 13. Since I really wasn’t sure how this would turn out, I decided to initially try this with their medium form. It measured around 22x40”. I use the epoxy calculator tool to figure out just how much epoxy I would need. To get 1.5” of epoxy I would need around 6 gallons of epoxy. I knew I wanted to try a three-color gradient, so all I had to do was mix up three, tw0 gallon buckets of different shades of blue.
The blue I went with was an alcohol dye made by transtint. They make high-quality dyes that I have used for years. They are also exceptionally beautiful colors. I will say deciding exactly how much dye to add to each bucket was nerve-racking. This was going to be close to $1000 of epoxy, and once it’s poured, there would be no going back or adding/removing any color.
I worried that if I just poured all the buckets at once, the colors would mix too much and ruin the gradient effect I was going for. So my idea was to set up temporary dams, pour all the epoxy, then remove the dams. Hoping the colors would then slowly blend as the epoxy set up over the next 12 hours.
The gradient pour didn’t quite go as expected. The dams didn’t hold very well, epoxy seeped under before I was ready, and initially, I thought I might have a failure. However, after I removed the dams and let science do its thing, the colors started to look really cool together. My wife videoed and gave me instructions on where to help feather spots that were too concentrated to the lighter areas. But neither of us had any idea what we were doing, so eventually, we decided we could make it worse before we made it better, and we would leave it and see what happens. The next day I was pleasantly surprised with the results. The gradient might not have been exactly what I had in mind, but it was usable.
I figured that no matter what I did, I needed it surfaced. So a few weeks later, I took it into the industrial woodworking shop I use and made a few passed on their planer/wide-belt sander. So now I have a perfectly flat rough, sanded slab of blue epoxy. Now, what do I do with this brick of plastic?
Change of plans
This chunk of epoxy sat upstairs in my shop for around 18 months. Occasionally I would pass it and think, “I’m never going to do anything with that; should I just throw it out?” Lucky for me, I never throw anything out, and eventually, I had a kind of crazy idea.
I have known how susceptible epoxy is to heat for quite a while. Epoxy table makers have said they have had a river table “taco” on them during a delivery when outside in the sun for just minutes. I have even used the sun in the past to fix a cupped table. I had a table that came out of the mold cupped, so I heated it in the sun, clamped it flat as the epoxy relaxed, then let it cool slowly. The next morning it was nice and flat. So I knew you could retrain epoxy with heat. But how far could I take this? Could I get this epoxy brick to bend 90 degrees and maintain its shape otherwise? I figured nothing risked, nothing gained, so I decided to try it. My videographer asked what my confidence level was, I told him 10%.

How do you bend epoxy?
I have never bent anything in woodworking. Not with steam, laminations, or the sun. But I do watch short clips of people doing it on social media, so I figured I would do no research and figure it out on the fly.
I decided to build a curved box (there is probably an actual name for this) out of plywood to start. I cut three pieces of 3/4 plywood with a six-inch radius on one corner. Then cobbled them together with a series of 2x4s to vaguely resemble a box. Then I tried to bend some thin MDF around the radius. The MDF quickly snapped in half. Then I tried the hardboard, and it snapped slightly less quickly. Then I tried 1/4” plywood; it snapped pretty quick as well. Finally, I endured the long process of cutting slots across the plywood. I had to cut almost through the plywood for this to work. Only leaving 1/16” or remaining. After an hour of slicing, I had enough cuts to bend the plywood around my radius. This worked exceptionally well. I then epoxied, and brad nailed the curved plywood to the form.
I thought ahead for once and added several holes along the edge the epoxy would sit on. This would allow me to clamp the epoxy to the form as it bent (in theory).
Waiting for the right day
I knew it would take a lot of heat to bend the epoxy around a tight radius like this, so I waited for the next 100F day. The problem is, in western Oregon, we only get a few of those a year. So if I missed my window, I might not be able to attempt the project this year. Luckily for me, a few weeks later, we had a forecast for a string of days over 100. I picked the hottest day, which was forecast for 104.
I waited until it was nice and warm, but not too late. Around 11 am I had the epoxy clamped to the form. Waiting for the sun and gravity to do its thing. While I was skeptical that any of this would work, I figured it would make an awesome video if it did. So we had two cameras rolling with different lenses and timelapse intervals, so we wouldn’t miss a thing. After about 30 minutes, I could see the epoxy starting to bend and got excited. 60 minutes in, and it began to dip. Unfortunately, here is where both cameras overheated, and we lost our timelapse. The start of it looked cool, anyway.
Over the next several hours, I continued to assist the epoxy in bending more. With clamps, ratchet straps, and just pushing it over. By 4 pm it was completely bent around the form. Looking like this might actually work. I took frequent temperature readings of the epoxy. It remained around 135F through most of the day. I knew a safe temp and, in my experience, a temp that should “reprogram” the epoxy to remember this new shape.
I figured I would let it bake in the sun all day while clamped, then leave it overnight, letting it cool slowly. The next morning I came out to remove the clamps, not knowing if it would spring back to flat like a bent couch cushion as soon as I removed them. Imagine my delight when it remained perfectly curved after all the clamps had been removed.
Now what?
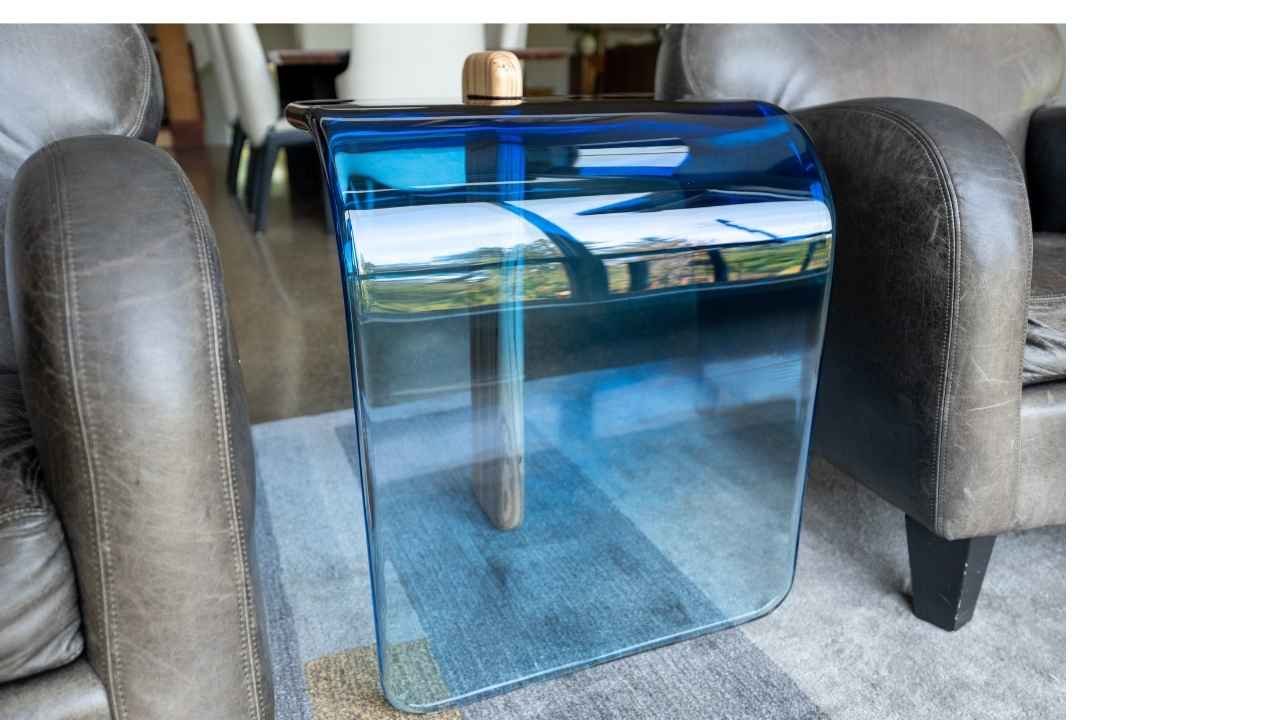
I never really expected to get this far, so I did not have a great game plan for how I wanted to finish this piece. I did think that it probably deserved a high polish though. So I started there.
I started sanding at 80 grit, painfully working over all the surfaces. The back side of the curve was especially difficult. I continued through grits 100, 120, 150, 180, 240, 320, 400, 500, 600, 800, 1000, 1500, and finally 3000. And yes, it took just as long as you would think.
To get that show-car level of gloss I then moved on to the 3M Perfect It buffing compounds. This was not as bad as sanding, but did take a while. Eventually I had a wildly clear, insanely glossy chunk of curved blue gradient epoxy. Weirdly, just as I had hoped.
Tables need legs

I showed my wife what I had created, and she was actually pretty excited by it. She said the table “MUST” have a clear acrylic leg to go with the clear top. Which I wasn’t opposed to. So I went to TAP Plastics and had them cut and polish a 1.5x6x25” block of clear acrylic. After getting the acrylic in my hands, it was clear that it would require a substantial mounting system. So I spent the better part of a day creating a jig to drill perfectly straight dowel slots for some custom clear acrylic dowels I made. When I finished routing the holes in the leg, two things were clear. One, this was going to work well. And two, I hated the look of it. The holes in the acrylic were just too prominent. And the idea of doing the same thing in the perfect blue top was just too much for me. So I abandoned the acrylic leg design.
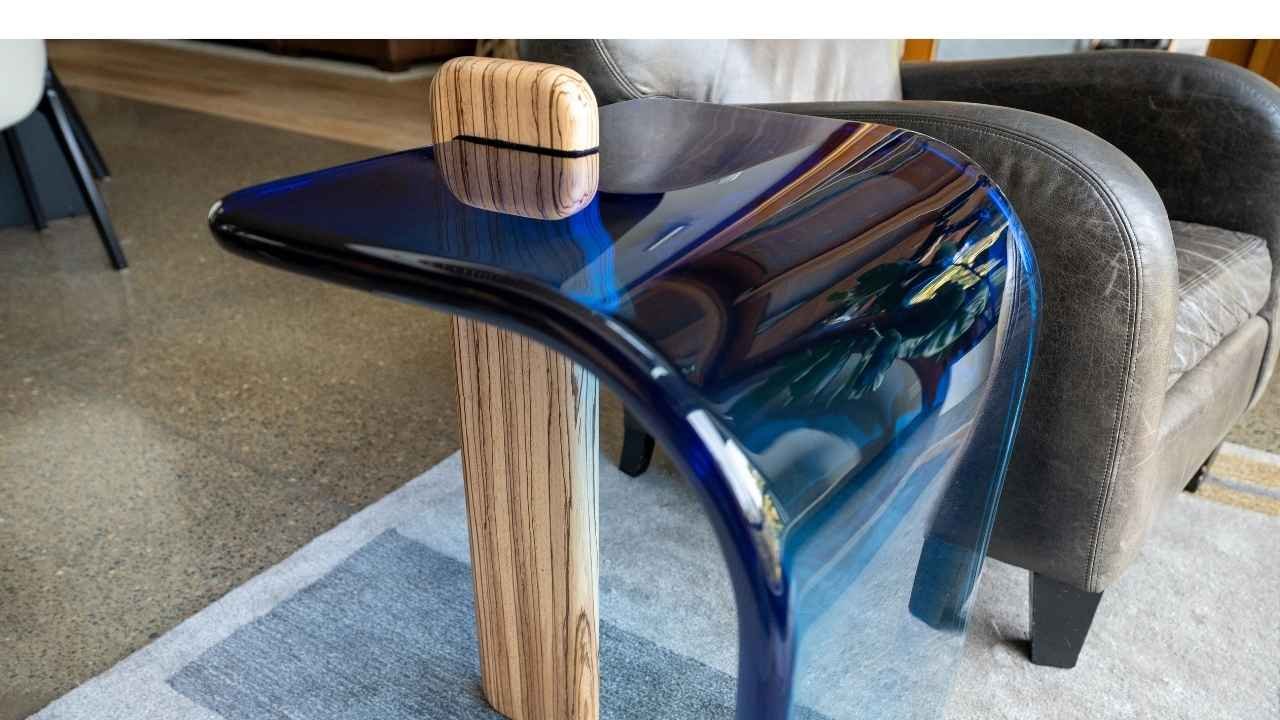
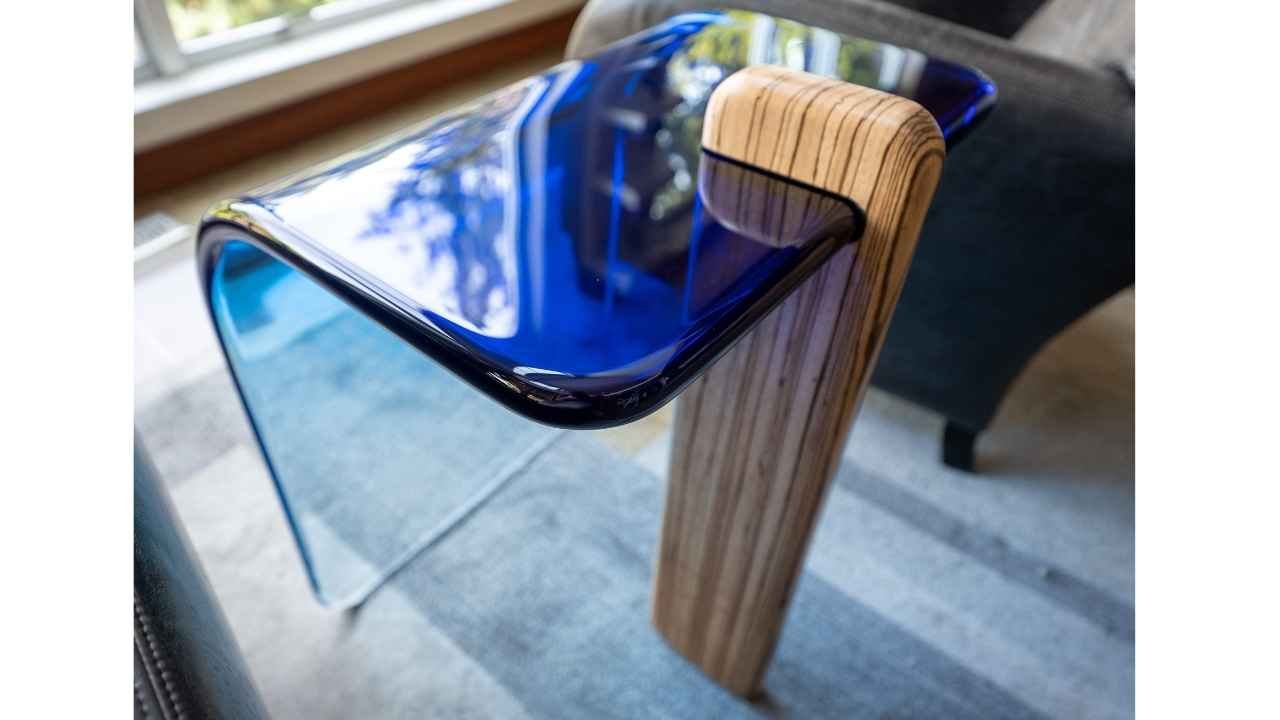
Eventually, I decided to try a notched wood table leg design. This isn’t a design I can remember seeing before, but my wife told me she has seen it many times at furniture market. So I won’t lay any claim to originality. I did want to get a pretty remarkable piece of wood, though. Something I hadn’t used before. So I drove to my local woodworking supply store and browsed their racks. I wasn’t too impressed with what they had, and as I was about to leave, the manager came out and asked what I had in mind. I told him I wasn’t sure but gave him the dimensions. He asked if I was interested in Zebrawood. I said absolutely. He then brought out a piece he was saving for himself that was perfect for what I needed. In total, I believe the cost was just over $100. Not bad, considering the acrylic was around $230.
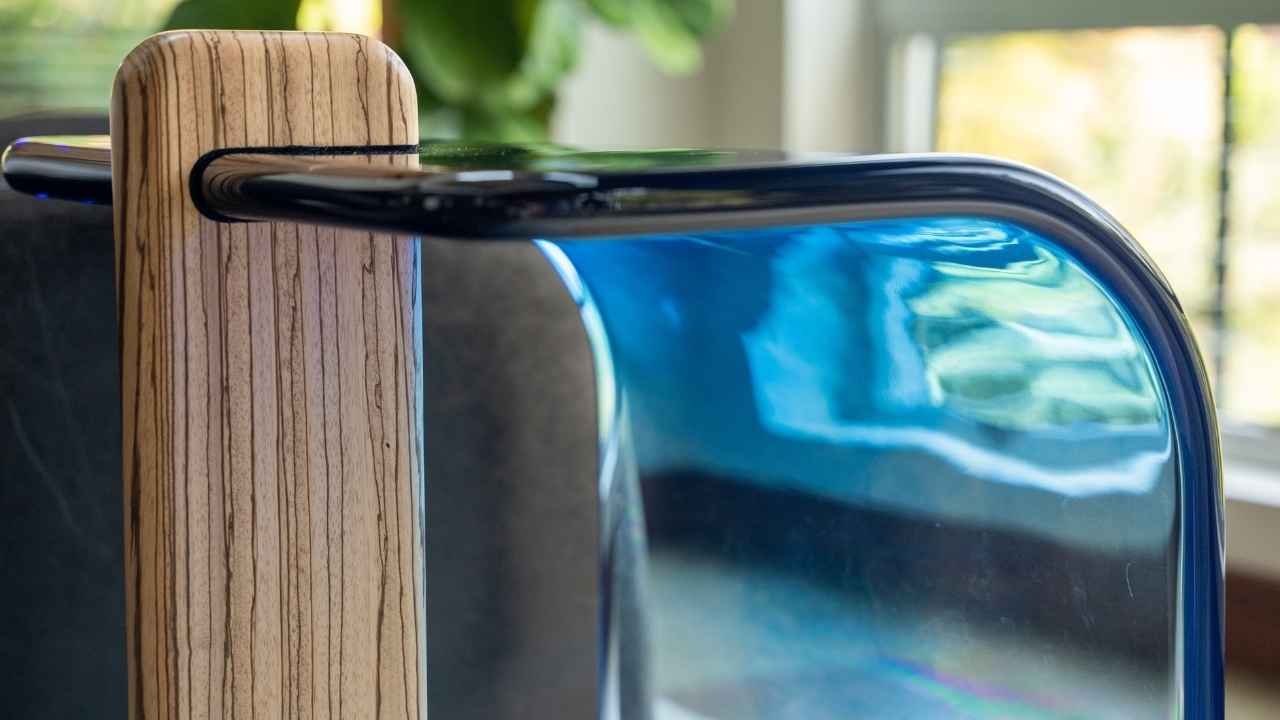
The idea I had was to cut a perfectly notched “C” in the wood, then slide that over the edge of the table. Essentially making a removable table leg. However, I didn’t want to scratch the epoxy, and I wanted a little room for error. So I decided that I could add a thin layer of adhesive felt to the notch. Giving a little padding to the wood and a little more room for error on my end.
I made a test piece out of a 2x6, and it worked better than expected. So I dove right in on my Zebrawood chunk. Much to my surprise, it worked just as well on the Zebrawood as it did on the 2x6.
Finished Product
I try and remain humble and refrain from boasting too much about any moderate success I might have building furniture. However, this time I might be too excited about how this piece came out. I suppose the fact that I gave myself such a small chance of success here and had no idea what this piece would look like in the end also adds to my excitement for the result. So if you haven’t been able to tell, I am beyond thrilled with the results of the table. It looks like a piece of melted glass, not epoxy. Any distortions or defects just add to the “melted glass” aspect of the table. The single Zebrawood leg not only looks amazing but is shockingly stable. At least on solid flooring, it has some wobble on the carpet. I made a set of matching Zebrawood coasters to hopefully keep the epoxy glass clear and scratch-free. That will be the biggest downside of this table. Epoxy is much more prone to scratching than glass or even wood.
Now my mind is racing, wondering, “what else can I bend?” Or “do I have to use the sun?” I am beyond excited to see what is next in the curved epoxy world.

just give it away?
I generally either sell my items or auction them off. However, I want to give a little back to my audience, so this time I think I will give this to one of you. So check out the box below to enter your email to have a chance to win this piece. I’ll even include free shipping worldwide. Detail here: : https://www.blacktailstudio.com/giveaway-blacktail-epoxy-drip-table