Trial By Fire: First Burnt Epoxy Table
Intro
How do you justify burning a perfectly good slab of wood? You don’t. Unless you’re planning on doing something completely different, inarguably ambitious, and potentially dumb. When making tables, every decision from what base hardware will be used, to the specific colour palette chosen, to the wood itself; is made from a place of pure subjectivity. That’s why, when given a $20 slab of clean maple, it made sense to try something entirely new. Because why not?

The goal
Over the past few years epoxy river style tables have become increasingly popular. For any craftsperson it can become very easy to “play the hits”, sticking to what they know and what has worked for them in the past. However, without growth there tends to exist a lack of progress, and to stimulate growth in creative fields, it is often necessary to experiment. Pushing the envelope and trying new things is how we all learn and improve. This project was derived from that very principle: taking a departure from comfort and safety, in search of growth.
Process
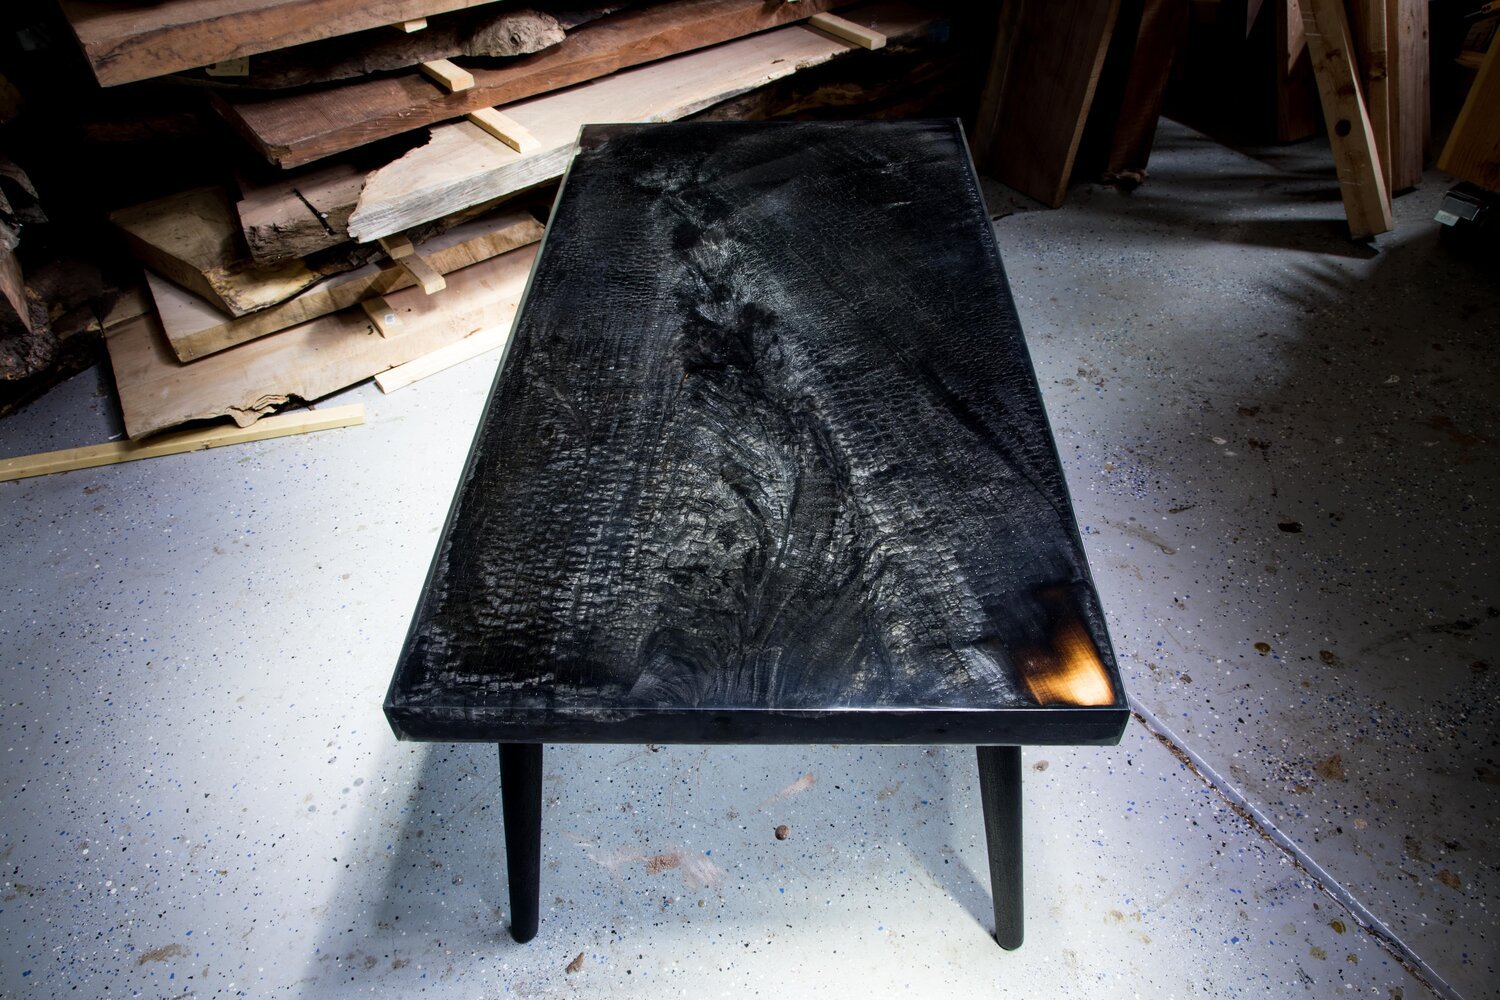
After successfully completing a small batch of coasters, used as a proof-of-concept trial run, to confirm the the blend of epoxy and burnt wood would commingle in an aesthetically pleasing manner; it was time to start burning. Using a $50 propane-burning, weed-killing torch, from Home Depot, the scorching commenced. The $20 slab of maple was burnt thoroughly and evenly along its exterior, creating what is called a “Gator Skin char”. “Gator Skin char” refers to the burnt wooden texture’s likeness to alligator scales.
Fighting Nature
Something interesting about working with high heat, or fire in this case, is the ability that fire has to morph an object into shape. Wood is no exception: when burning the maple, it began to aggressively warp, meaning that its shape was no longer in optimal table building form. Luckily, using the propane torch, the slab was able to be manipulated and bent back into a leveled shape.
DIY Form Construction
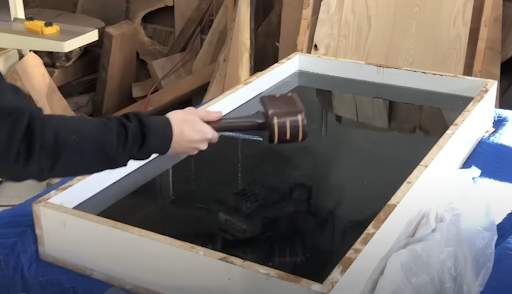
Next, a form was created to encapsulate the charred slab when the time came to fill it with epoxy. To learn more about exactly what is needed and how to build your own epoxy form you can click here, for a full video-walkthrough , or here for the written step-by-step instructions on form/ mold building.
Sealing the Burnt Wood
To seal the bottom side of the slab, deep pour epoxy was lathered liberally with a wide-set paintbrush, saturating the table without creating excess pools of epoxy. Though the epoxy used was an older tub of left over deep pour epoxy, the best epoxy to use for this type of project is Liquid Glass, a two-part epoxy designed to eliminate bubbles and to accent depth and clarity. You can find that epoxy right here. The act of sealing a table with epoxy before moving forward with the full epoxy pour is crucial to a successful table build. Sealing the table before pouring the bulk of your epoxy allows the table to stabilize, meaning the thin early layers of epoxy work to remove any bubbles that might arise from the burnt crevasses in the table.
A Bad Epoxy Experience
During the process of preparing the epoxy for pouring, something very odd and antagonistic floated into sight…literally. While mixing the epoxy together, an array of small crystallized debris began circling within the mixing container, threatening the integrity of the project. What looked as if a small dustbin had been spilled into the mixing tub, was actually a reaction taking place within the epoxy itself. Something that, if left, would have been detrimental to the overall appearance of the finished table.
Quick Fix
To combat the quickly forming crystalline fragments within the epoxy, a hot bath was drawn in an attempt to reduce or remove the fragments. With the mixing bucket resting in the hot water bath, it reached an internal temperature of about 100℉, at which point the crystal-like debris vanished and the epoxy returned to a pristine translucent state.

Plane ole Field Trip
When the epoxied table top was removed from its mold, the depth of tone was truly beginning to shine, and it was time to plane the table. To do this, a visit to Creative Woodworking in Portland, Oregon was in order. Creative Woodworking rents out their space and time so that woodworkers can accomplish industrial tasks without needing to own industrial machines. The table top was run through their planer/wide belt sander to ensure that it was perfectly flat.

Finishing
Once the table had been cut to size and sanded, it was ready to be finished with the hard, table top epoxy. Moving from sanding to the application of the table top epoxy proved to be one of the most visually satisfying moments of the entire build. To see the reveal of the incredibly detailed “Gator Skin” slab texture, under epoxy: watch here.
Matching Table Legs
A char-covered table would not be complete without its gothic table leg counterparts. For this table, an inexpensive set of wooden table legs was purchased from Amazon and each one was treated with a propane torch. Purposefully, the legs were not treated with epoxy, but rather a hard wax matte oil. This allowed them to match the table’s aesthetic, but to lightly contrast the shine of the top while supporting it both physically and compositionally.

Accidental Accent
Typically when something doesn’t go to plan in a table making, it means backtracking, rethinking something, and generally a certain amount of tedious work. However, every once in a while life decides to gift us with unintentional success. In this case that gift was an overlooked section of the table that had been planed a little too much. Due to the warping caused by the fire, an uneven section of table was planed past its burnt exterior, resulting in a corner of bright maple shining through the char. This “mistake” could have been fixed with a bunch of work, but it actually ended up adding an accented element to the table that was really favourable. In fact, this happy accident looked so cool that it inspired an entire table build, based on sections of burnt and unburnt wood. You can learn more about that build by watching the video right here.
Reveal
With the legs attached, the coffee table was revealed in its final form: a depth of charred maple enveloped in a high gloss sheen, working together to create a stunningly gloomy, ink-black accent table. To learn more about the process of building this table including how to achieve a high gloss, how to bend a slab of wood with fire, to see a happy accidental accent, and to explore all of the tools and materials used, watch the full video here.